Mike Russell started Melbourne's Baker Bleu with a bread obsession, three recipes and his life savings and a hard-won belief there is more to life than a soulless desk job.
"I loved baking bread because it was making something from start to end," he says.
"It was a craft that had been practised for centuries using the same basic elements: flour, water, heat, time.
"And yet every time you did it, you were back at square one, no matter how many years you'd been baking. A baker is only as good as their last loaf."
Russell and his partner Mia opened the bakery in 2016, a small site in Elsternwick, before opening a bigger premises in Caulfield North in 2019. Late 2020, they met Neil Perry and he partnered with them to open a cafe in Double Bay, Sydney.
In his first cookbook, Baker Bleu: Bake it til you make it, he shares his obsession.
"I want people who read this book to believe in themselves the way we did," he says.
"I want you to trust that you can make amazing bread at home ... I don't want to make it hard for you ... this is a real life approach to making bread."
Start with a starter
When you are making a starter, it's like a puppy that you have to keep an eye on. Stick to the intervals for feeding, as it needs to be strong and healthy to make all these recipes sing.
A sourdough starter is the first step to get towards a levain (starter mixed with fresh flour and water that gets added to the dough). A starter is simply flour and water that has taken on the cultures that naturally exist in the air and on our bodies, and fermented them.

A basic starter
Begin making your starter for the first time about five to seven days before you want to bake. Five days is the soonest that your starter will be ready; seven days gives you a safety net in case the starter isn't ripe enough.
The quantity this recipe makes is not an exact quantity that is going to be used when you start baking. It's more of a building block to get you on the road to a healthy, ripe starter that you can dip into when you are ready to bake.
The quantity is also in the sweet spot of being not uncomfortably huge, but large enough for the starter to generate its own bulk heat. This is important because if the quantity is too small, it will never get any fermentation heat going and you'll be on the back foot before you even begin baking.
Once you've got a healthy starter going, you can keep it on hand for your baking needs pretty much indefinitely.
Day 1
300g whole rye flour
375g filtered water, at 28C
On day 1, you are making your "seed feed". Half of this seed feed will be used in the day 2 feed.
Add the flour and water to the plastic or glass container you've selected to be the home for your starter.
It's super important to use just your hands and your pastry card scraper to mix your starter: your fingers and nails carry lots of wild yeasts to activate the starter. Mix with one hand, starting just with your fingertips, working in a circular motion to create a slurry. This slurry quickly becomes a really wet dough that you mix through using your fingers. It should not require you to mix with your whole hand.
Make sure there are no dry bits on the outside of the container by using your pastry card to scrape down the sides of the container. Once you're done, you're looking for a smooth dough-like mix that resembles cooked porridge, with no dry bits or clumpy pieces of flour.
Cover the container with a clean cloth or tea towel and fasten it to the bowl with an elastic band. Stand the container for 24 hours in an area of the house where it's a stable, consistent temperature. The optimal temperature is 20C. Don't leave your starter in an area less than 10C.
Day 2
200g day 1 mix
90g whole rye flour
90g plain flour
225g filtered water, at 28C
Discard 475g day 1 mixture, leaving 200g in the container, then add the flours and water to the same container and repeat the mixing process. It's important to use the same container you used on day 1; don't clean it or use a new one or you'll just throw away the microflora that is beginning to grow and form the basis of your healthy starter. This is such an important part of the process during which you're building the blocks of the sourdough culture.
When all ingredients are combined, stand for 12 hours in the same spot as before.
Days 3, 4 and 5
90g starter from previous day
300g plain flour
270g filtered water, at 28C
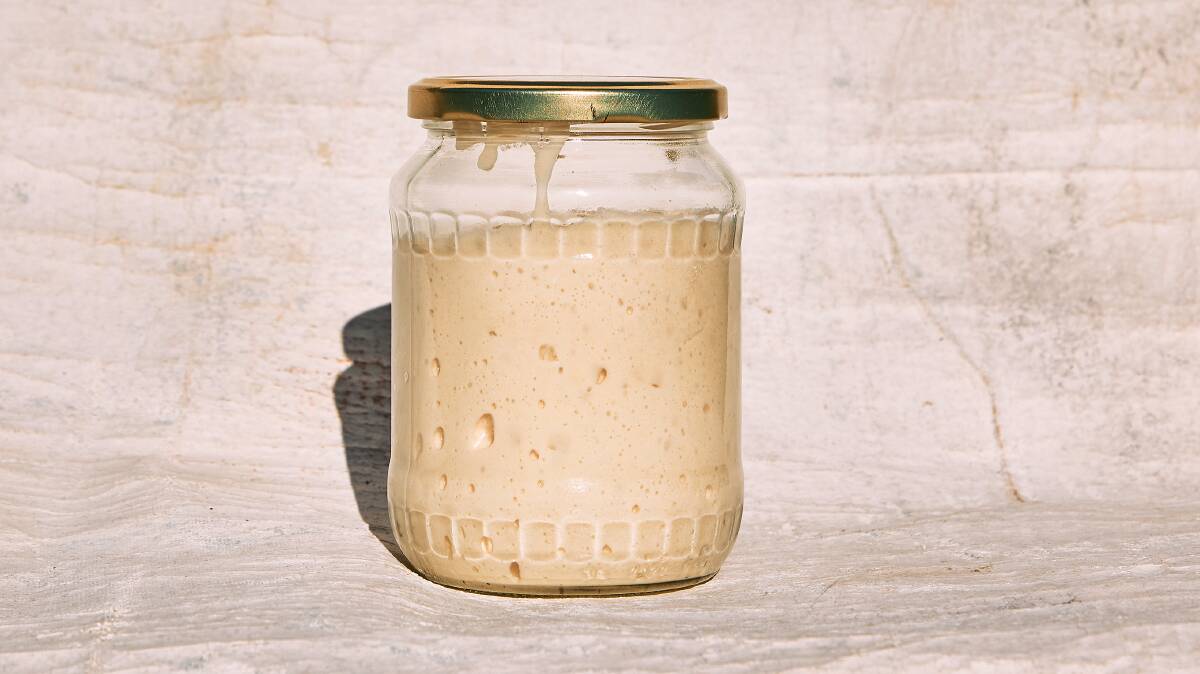
Each day, discard the extra starter, then repeat the mixing process with the same container and let it stand for 12 hours, as before. By days 3, 4 and 5, the starter should start to show bubbles six to 12 hours after mixing. You're looking for small-to-medium bubbles on the surface. Its aroma should be like a combination of strong yoghurt and bananas, and it shouldn't smell too alcoholic.
When is your starter ready?
When it's ready, the starter should have medium-to-small bubbles on top, with an aerated appearance (but it shouldn't look too gassy). It should also be in the window of being ripe (approximately six to 12 hours after you mixed it). Look for the smells described above. Finally, taste it: the first flavour should be sweet and banana-bready, followed by a tangy aftertaste. If it's acidic all the way through and there's no sweetness at all, your starter is overripe.
The float test is the best way to make sure your starter is in the right window. Take a small spoonful of starter and drop it into a clear glass or measuring jug of water. If it floats to the top, or even partially floats, it's ready to bake with. If it's not ready, you can always leave it for another hour to ripen. If it's overripe, it will feel runny. Feed it again and wait six hours, again leaving it in an ambient environment. Either way, if your starter's not in the right state, your loaf just isn't going to perform, so it's not worth pushing ahead. Wait, and get a better result.
This is now your healthy, active starter, something you can keep alive for weeks, months, years or generations. Make it your baby.
- Baker Bleu: Bake it til you make it, by Mike Russell. Murdoch Books. $49.99.
Country loaf: the beginning and some ends
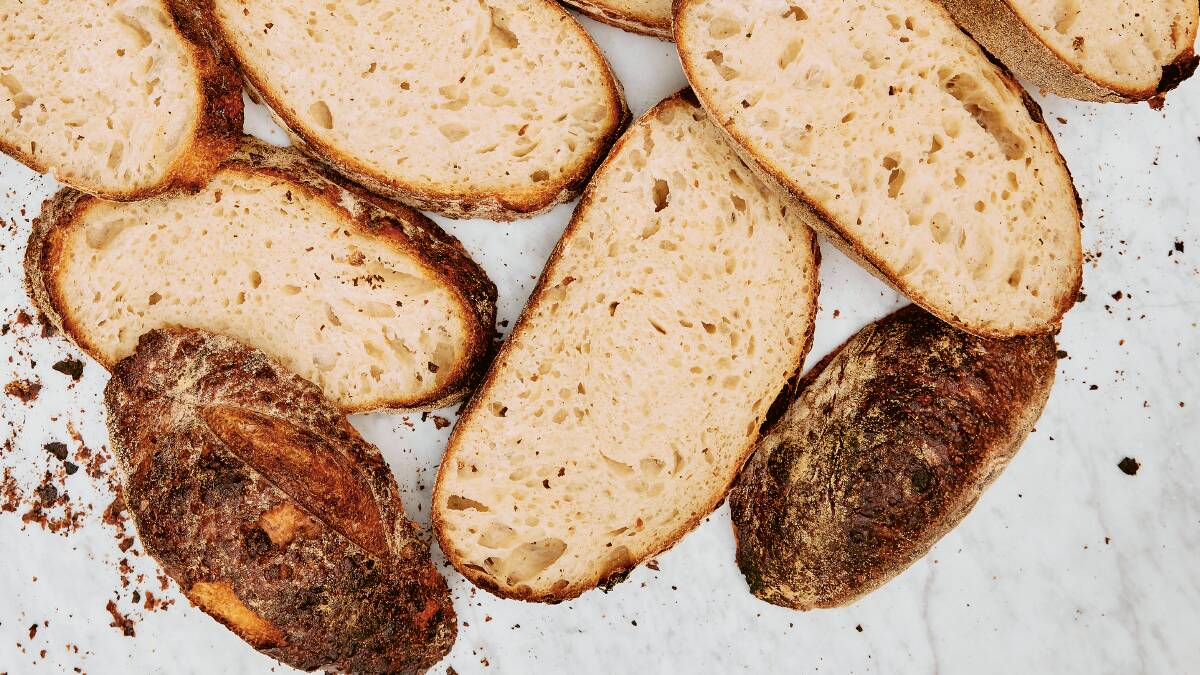
Once we got the lease on our first shop and spent lots of money on equipment, the pressure was on to make some bread. Good bread, at that. Much like a home baker just starting out, our own repertoire started with one loaf: the country loaf.
Everyone loves a country loaf. It's versatile, it's simple, it doesn't require any tricky shaping or added ingredients. At its core, it's a traditional, naturally leavened loaf, made in a rustic French style with time-honoured techniques. The paths are endless, too: use fresh slices in sandwiches, tapas, tartines; or turn leftovers into toast, crackers, croutons or breadcrumbs.
Baker Bleu was built from the simple country loaf, with one style branching into many, and then other items added on top and around it. You can start your own baking journey with this recipe, too, since this basic dough can be flavoured easily, or turned into something else entirely, such as focaccia or fougasse. In fact, this chapter shows you exactly that.
A few tips before you start
+ Feed your starter ahead of time. If your starter is kept at ambient temperature, feed it six to 12 hours before beginning this recipe. If it's been dormant in your fridge (i.e. you only feed it once a week), allow time for two feeds (so 12-24 hours).
+ Weigh out your ingredients before you begin mixing. Things get messy.
+ Always start by measuring the wet ingredients into the bowl first, in case you get any of the quantities wrong. It's easier to start again before you add the dry ingredients, after which you risk losing a whole batch of dough.
+ Don't blindly follow the recipe, instead use your senses. The recipe really is just about the measurements and the mixing of the dough. After that, you need to look at and listen to the dough to figure out what it needs.
+ Don't panic: if anything goes wrong, you can always make focaccia.
Ingredients
180g ripe starter
480g strong flour
120g wholemeal stoneground emmer or spelt flour
450g filtered water, at 28C
6g barley (or rice) malt syrup
16g fine pink salt
Preparing your starter
1. Feed your starter six to 12 hours before you want to start mixing your dough. If you keep your starter in the fridge give it two feeds, then pull it out an hour before you want to bake so it comes up to room temperature.
2. Do a float test to check the starter is ready to bake with.
3. Once you've taken out the quantity you need for this recipe, do a standard feed of your bulk starter to keep it nice and healthy.
Mixing
1. Weigh out all remaining ingredients into separate bowls or containers as if you're running a professional operation. This is important in making sure you haven't forgotten anything. It also means everything is ready to go once you start getting your hands dirty.
2. Check the temperature of the water with your thermometer. You'll want it to be right on 28C; anything colder will affect the timings. Add the water to your mixing bowl, followed by the starter - scoop this out with your hand; all the microbes from your skin will help to encourage your starter to grow. If it's perfectly ripe and ready, it will float like a cloud.
3. Add the malt syrup, then place both flours in the bowl. Finally, add the salt, checking it doesn't come into direct contact with the starter. Pause, and visually check off that everything is in the bowl.
4. Hold onto the bowl with your clean hand and then, with the fingertips of your mixing hand, start making small circles in the centre of the bowl. (As a right-handed baker, I hold the mixing bowl with my left hand and use my right hand as the mixing tool, that way I always have one clean hand and one dirty hand; if you are left-handed, do the opposite.) After a couple of rotations, extend the circle to grab all the unincorporated dry bits on the sides of the bowl and bring them into the middle. Keep using your fingertips, not your palm.
5. When things are starting to come together, the dough will still look a bit scraggly, which is fine. We are not yet developing a dough, just forming the dough mix. Once the ingredients have come together, start using your hand to squeeze the scraggly dough ball, spinning the bowl around slowly with your free hand. Alternate between squeezing the dough and doing the revolutions with your hand. We are now starting to work the gluten. Continue this for four to five minutes until there are no more dry scraggly parts and you've formed a fairly uniform ball.
6. Now, start lifting the edges of the dough and folding them back over and into the centre. With each fold, continue to turn the bowl slowly. After one revolution, and about eight to 10 folds, the dough will resemble the base of a round dumpling. With this dumpling method, you are speeding up the stretching and folding method; in fact, you are recreating your own version of a mechanical mixing bowl. Continue this lifting, stretching and rotating for two to three minutes. You should notice the elasticity of the dough change even in this short space of time.
7. Cover the bowl with a pizza tray and leave the dough to rest for 15 minutes. Repeat your homespun mechanical mixing bowl process. With your mixing hand, continue to lift and fold the dough into the centre while your clean hand rotates the bowl. Do this for another five minutes. When you're finished, scrape down your mixing hand and the side of the bowl with a dough scraper to get any stray bits. The dough should look slightly shiny, a bit loose and a little bit lumpy in texture.
Bulk fermentation
1. Cover the mixing bowl with the pizza tray and leave the dough somewhere relatively warm with a consistent temperature for 1.5 hours to rest and rise.
2. Remove the tray and give the dough another series of lift and folds, giving the bowl two full rotations. You should notice a big difference in the strength of the dough, and it should feel smoother and more elastic.
3. Scrape down the sides of the bowl again, then cover it with the pizza tray and leave the dough to rest, again in a warm place, for another 1.5-2 hours.
Shaping
1. Shaping requires just as much attention and intuition as the other steps. You don't want to shape your loaf if the dough isn't ready for it; if you shape it too early, it can affect the final loaf composition and oven spring, that magnificent rise that comes with a well-proofed dough. If it's underproofed, it simply will not have developed enough strength to become a big, beautiful, aerated loaf. At the end of the bulk fermentation, the dough should have increased in volume by almost a third and look and feel elastic. It should seem full of life, with a gassy, billowy appearance, and be almost dome-like in shape. If it's dormant and unresponsive when you poke it, and it's not bouncing back, then it's underproofed and needs a bit longer. If you're still unsure, you can do a test similar to the starter-readiness test: tear off a tiny piece from the edge of the dough and place it in a small cup of water; if it floats, it's ready.
2. Start shaping by repeating the lift and fold technique in the bowl. Keep rotating the bowl and folding until you've stretched the dough into a ball that has enough tension that you can almost get your hand under it.
3. With the dough scraper, ease the dough out of the bowl, turning it out onto a bench dusted lightly with flour. You want the folds or seams of the loaf touching the floured bench and the smooth dome air-side up. Rest the loaf momentarily while you prepare your proofing basket.
4. Ricotta baskets are the ultimate proofing basket. Take a tea towel or cloth, place it in the basket and dust it with your dusting mix.
5. Now come back to your loaf. Pick it up with both hands, then let the bulk of it drape down into the bowl, releasing it so it folds over onto itself. Now pick it back up, placing it on the bench with the seam down.
6. Pick the dough up again, place it in one hand, then use your other hand to rotate the dough 90 degrees, tucking the sides of the loaf underneath as you go. If you're right-handed, rotate with your right hand and gather with your left. Imagine the loaf as an upside-down dumpling, with the folded creases on the bottom and the smooth surface on top. As you pull the sides underneath, you'll create tension in the loaf, and it should end up creating a ball (or boule) shape. (If you've baked before you might have done this step by dragging the dough across the bench, but I prefer to use my hands because it's gentler on the dough.) You'll need to do about six to 10 rotations to get this shape.
7. Place the shaped loaf into your dusted cloth-lined basket with the creases facing up and the domed side on the bottom. Fold the edges of the cloth over the loaf to cover it.
8. Rest the loaf at room temperature for one hour, then transfer to the bottom of your fridge, where you'd normally keep your vegetables. This is the warmest part of your fridge, so clear a space here, even if it means pulling out your crisper drawer so the basket can sit there on an even surface. Now your final proofing process begins.
Final proofing
1. This is the make-or-bake phase for all the beautiful ingredients and focused energy you put into the mixing and shaping. A perfect proofing process doesn't always come off; this part is about instinct, which develops over time. For this final stage, the minimum time at the bottom of your fridge should be 12 hours, but I prefer 18 hours. Proofing the loaf in the fridge slows down the fermentation process - it's called "retarding" in the baking world - increasing flavour and adding colour to the crust.
2. After it's spent the required time in the fridge, you'll need to create a window of time for your loaf to talk to you. This means taking it out of the fridge four hours before you bake, so that it has three hours to come to room temperature and show you its true colours before baking. Place the loaf in a mildly warm part of the house for three hours. It's during this next period that you need to be attuned to the calling cards of your dough telling you that it's ready.
Look for:
The Proofing: The dome-like shape, the billowiness of the loaf. The loaf should be perky in appearance, but not too perky.
The Tension: Is the loaf holding its shape, or is it kind of collapsing and oozing all over? You want shape.
The Feel: It should be gassy and aerated, but spring back at a light touch.
When a loaf is overproofed, the dough will look gassy and bulging, almost on the verge of collapse. If you bake it like this, it can result in a deflated pancake instead of a nice loaf. If you don't, however, it's not a complete failure, since you can make focaccia with it instead.
At the other end of the spectrum, if it's underproofed the resulting loaf will be like a tight balloon and be too tight and tough in texture. In this case, give it a bit longer at room temperature.
Baking
1. Once you've had the loaf out of the fridge for two hours, start heating the oven and Dutch oven. This is the most crucial step. When I say heat, I mean grab the temperature dial and turn it all the way up to 250C, or as high as your oven goes, even if that's higher. Don't turn on the fan.
2. Place your Dutch oven in the oven with the lid on and set a timer. It should take 40 minutes for everything to get roaring hot.
3. By now, the dough should be at hour three of proofing at room temperature. Still, that doesn't mean you just throw the loaf in the oven; look for all the signs mentioned opposite to see if the loaf is ready and, if needed, wait a bit longer, checking it at 15-minute intervals.
4. Once it's ready, you'll need to move quickly, so preparation is key: have a sheet of baking paper as wide as your Dutch oven (or even 2.5cm/an inch wider) ready. This will be your landing pad after you take your loaf out of its basket. Have your chosen scoring tool within easy reach.
5. When the oven is roaring hot and the loaf looks ready to go, gently tip the loaf out from the basket onto the baking paper, so that the seam of the loaf is lying flat on the baking paper and the dome-shaped side is facing up.
6. Score the loaf using your blade. Less is more with scoring, and the loaf will again dictate to you what happens. (If the loaf is sitting up and not so relaxed, you may even want to think about resting it up to another hour longer.) If you feel confident in the loaf's condition, then go ahead and score. If the loaf is well-and-truly ripe and is feeling like a jellyfish, take it easy on the scoring - perhaps give it only a single delicate score down the middle or a light cross in the centre of the loaf. If it's less relaxed and still looks quite tight even after you've rested it for longer, then score it a little more deeply to give it room to expand during baking.
7. Once the loaf is scored, place a wooden board or heatproof trivet on the bench, slip on your oven mitts, and pull the Dutch oven out, being sure to close the oven door quickly. Place the pot on the board, then remove the lid. Gripping the edges of the baking paper, pick up the loaf and lower it gently yet quickly into the Dutch oven. Replace the lid and place the pot into your hot oven once more.
8. Bake for 30-40 minutes with the lid on, then remove the Dutch oven from the oven (again using mitts) and remove the lid. Place the pot, uncovered, back into the oven for a minimum of 30 minutes. This will give the loaf colour and flavour. Here is where you call the shots on what you desire in terms of crust and colour. I prefer a dark crust, so I bake it for 40 minutes with the lid on, then 40 minutes with the lid off. When you achieve the colour you desire, remove the pot from the oven, lift the loaf out and pick it up with oven mitts. To check it's done, tap the base with your knuckle. It should sound like a door being knocked.
9. Place your baked loaf on a wire cooling rack. Resist as long as possible before slicing it (at least 30 minutes): slicing into a hot loaf will reduce the shelf life of the bread and contribute to it becoming dry.
Makes a 1.2kg loaf.
Panzanella
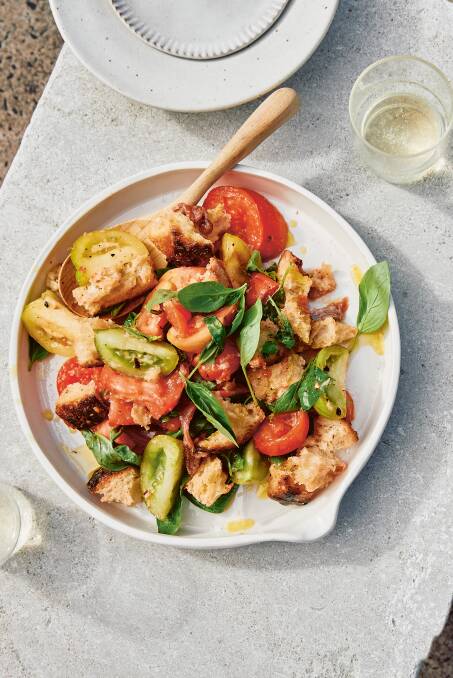
Panzanella could almost be called a baker's salad - it takes your hard work baking a beautiful rustic loaf and showcases it, even when the bread might be past its prime. This recipe is made extra summery with the addition of ripe nectarines. To showcase the jumble of colours and textures in this salad, it's best to use a big serving plate, rather than a deep bowl.
Ingredients
4 slices day-old country loaf, 2cm thick
olive oil, for drizzling
3 ripe heirloom tomatoes
3 ripe nectarines (optional; they need to be in peak season)
pinch of pink salt
100ml extra virgin olive oil (the highest quality you can afford)
80ml white balsamic vinegar (alternatively, white wine vinegar)
1 tbsp honey
1 bunch of basil, leaves picked
1 tin Ortiz anchovies
Method
1. Heat a chargrill pan or an oven grill to high. Drizzle the bread liberally with olive oil and then grill it, turning once, for up to one minute a side until the bread is crisp but not burnt, with visible grill marks. Once it's cool enough to handle, break up each slice into bite-sized chunks over your serving plate.
2. Cut each tomato in half and place cut-side down on the chopping board, then cut the tomatoes into uneven segments (all the rough edges are going to accelerate the amalgamation of flavours). Scrape them, along with all their juices, onto the plate.
3. Halve the nectarines, remove the stones, then cut the fruit lengthways into wedges. Scrape them and their juices onto the serving plate, too, then sprinkle everything with the pink salt.
4. Combine the extra-virgin olive oil, vinegar and honey in the bowl of a food processor, add most of the basil leaves (reserve some for garnish), and blitz to make a dressing. Avoid making this more than an hour before serving, or the dressing can discolour.
5. Drizzle the dressing over the salad and gently toss it all with care and love so you don't squash your tomatoes and fruit. Finally, arrange the anchovies evenly over the salad, scatter with the remaining basil leaves and serve.
Serves 4 as a side.
Pistachio, white chocolate and cherry cookies
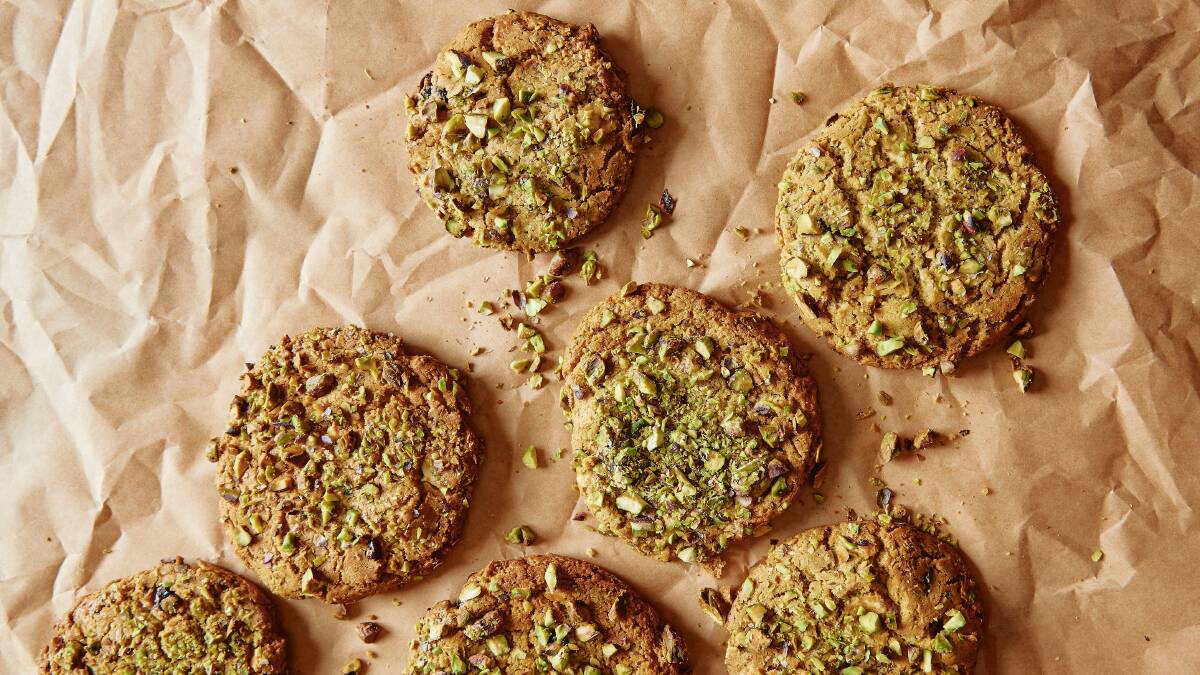
We love the pistachios that we get from Eric Wright at Go Just Nuts, grown on a farm in sunny Mildura, hundreds of kilometres north of Melbourne. He brines his pistachios so they're super crunchy. These cookies show them off fabulously.
Ingredients
220g plain flour
80g rye flour
5g baking powder
8g bicarbonate of soda
8g fine salt
135g unsalted butter, at room temperature
105g pistachio paste (see note)
265g soft brown sugar
65g caster sugar
65g eggs (about 1 1/2)
40g egg yolks (from about 2 1/2 eggs)
95g white chocolate, roughly chopped
95g dried cherries, roughly chopped
195g shelled unsalted pistachio nuts, roughly chopped
Method
1. Place the flours, baking powder, bicarbonate of soda and salt into a large bowl and combine with a whisk. Set aside.
2. Place the butter, pistachio paste, brown sugar and caster sugar in the bowl of a stand mixer fitted with the paddle attachment. Cream the ingredients on medium speed for five minutes until light and fluffy.
3. Switch to low speed and add the whole eggs and yolks in two batches, scraping down the sides of the bowl and making sure the first batch is fully incorporated before adding the next. Mix until all the egg is incorporated.
4. Add the bowl of dry ingredients and mix on low speed until just combined.
5. Add the white chocolate, cherries and 95g of the pistachios and mix briefly until evenly distributed.
6. Use a spoon or quarter-cup to scoop out pieces of the cookie dough approximately 60g in weight. Roll each piece into a ball, then press to flatten into discs.
7. Place the discs on baking trays or in a proofing tray lined with baking paper and cover with a tea towel or a lid, then refrigerate for four hours or overnight to rest.
8. Half an hour before baking, heat the oven to 180C and spread the remaining 100g of chopped pistachios onto a plate or baking sheet.
9. Remove the cookies from the fridge 10 minutes before baking. Press one side of each cookie into the chopped pistachios, then place the cookies onto a baking tray lined with baking paper (you may need a few trays) about 5cm apart, with the nuts facing up.
10. Bake for seven minutes, at which point remove the trays from the oven and gently tap them on a bench before placing them back in the oven for a final three minutes or so until the cookies are browned around the edges. (The tapping will give you nice flat cookies with a chewy texture.)
11. Remove the cookies from the oven and allow them to cool on the trays for 10 minutes before transferring to a wire rack to cool completely.
12. Cookies will keep in a sealed container at room temperature for three to four days.
Note: Pistachio paste should be 100 per cent pure pistachio butter. Read the ingredients list carefully. It can be bought from health food shops or specialist baking shops.
Makes 20.


